Welcome to my collection of quilting tip's, techniques and information.
These lessons I consider to be important recommendations for good quilting practice.
The three perennial problems I encounter in my classes are cutting, sewing and pressing.
These fundamental areas of quilting are covered as well as other topics I often get asked about.
Always choose 100% cotton fabric for your quilts. It is easy to cut and sew, and holds a nice crisp fold.
Fabrics that contain polyester are not recommended due to their inability to lie flat when ironed.
If you must use these fabrics, make sure that you choose those with the lowest polyester content possible.
You are putting a lot of thought and effort into making a quilt, so buy the best you can afford.
Pre-Washing Fabrics
Fabrics need to be pre-washed to guard against shrinkage and to ensure they do not bleed. The exception is pre-cut fabrics that are part of a quilting kit.
All cotton fabric shrinks, but not at the same rate. If your border fabric shrinks at a higher rate than the main piecing, you could get more ripples than you planned on.
To Check for Dye Bleeding
Snip a small corner from the fabric and place into a container of hot water for a few minutes. (Empty margarine containers or a white plastic bucket are perfect, as it is easy to detect any dye loss).
If there is any discolouration, the fabric will need to be soaked in warm water with salt or vinegar added.
Repeat this process until the water remains clear.
Be sure to give the fabric a final rinse in plain water to remove any of the salt or vinegar residues. Hang the fabric out to dry.
When still slightly damp, iron to remove any wrinkles.
Another important reason for pre-washing fabric is that it may remove the chemicals used to set the dye. Some countries allow the use of chemicals that are not approved in Australia. However, if chemicals are used to treat the fabric (so that it doesn't wrinkle for example) then these will not wash out. Best answer is not to use them for quilting.
Chemicals used could be formaldehyde, azo dyes and benzidine-based dyes.
The Australian Competition and Consumer Commission (ACCC) has stated that even though exposure to azo dyes is likely to be very low, the associated cancer risks give cause for conern.
If you have ironed fabric and noticed a smell, that is the dye setting any chemicals.
If you store your fabric unwashed, these chemicals can release toxic fumes into your room, which you then breath. Eventually, your body will have had enough and you will develop an allergy. The symptoms are not fun and they are not reversible.
Please don't put your health at risk. Pre-wash your fabrics before storing or using them.
Place a piece of fine sandpaper under the fabric which will grip the fabric so it doesn’t move as you trace around the template.
Place the template face down on the wrong side of the fabric and mark along the sides using a sharp lead pencil held at an angle. The angle keeps the point sharp so it moves over the fabric smoothly and gives a finer, accurate line.
For sharp points, do not trace around corners but extend the side lines past the corners, forming accurate cross lines.
When cutting, cut right on the line, not to either side.
The most important step for accurate rotary cutting is to ensure that the fabric is accurately squared up.
To do this, bring the selvedges of the fabric together creating a fold through the centre of the fabric. If the fabric does not lie flat, move the selvedges in the opposite direction until there are no puckers or folds in the fabric.
When you are satisfied that the fabric is completely flat, lay the fabric on your cutting mat with the fold in the fabric parallel to a grid line on the longest side of your cutting mat.
Place your longest ruler at right angles to the fold in the fabric and close to the edge of the fabric to be straightened. If placed correctly, the ruler should also be parallel to a grid line on the shortest side of your cutting mat.
(These directions are for the largest size cutting mat, if you have a smaller mat the fold will need to be placed parallel to a grid line on the shortest side of your cutting mat).
Cut through the entire length of the fabric exactly along the ruler. Always cut away from yourself.
All shapes can now be cut easily using your rotary cutting equipment.
To cut squares, rectangles and strips , add 1.5 cm or ½inch to the finished size.Eg, Squares with a finished size of 5 cm or 2 inches should be cut 6.5 cm or 2 ½ inches.
To cut half-square triangles, add 2.5 cm or 7/8 inches to the length of the finished short side of the triangle required.
Eg: Half-square triangles with a short side length of 5 cm or 2 inches should be cut into squares of 7.5 cm or 2 7/8 inches. Re-cut square diagonally (once) to yield 2 half-square triangles.
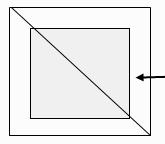
Size of shorter side of finished triangle
plus 2.5cm or 7/8 inch
To cut quarter-square triangles, add 3.5 cm or 1 ¼ inches to the length of the finished long side of the triangle required.
Eg: Quarter-square triangles with a long side length of 10 cm or 4 inches should be cut into squares of 13.5 cm or 5 ¼ inches. Re-cut square diagonally (twice) to yield 4 quarter-square triangles.
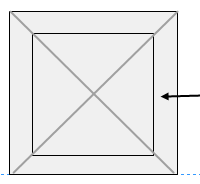
Size of longest side of finished triangle
plus 3.5 cm or 1 ¼ inches
Fabric Grain Lines are an important consideration when cutting fabric.
The three types of grain lines are:-
1. True grain which runs parallel to the selvedge and has little or no give.
2. Crosswise grain which is perpendicular to the selvedge and has a small amount of give.
3. Bias grain is any direction other than true or cross grain. True bias runs at a 45 degree angle to the true or cross grain.
Deciding which grain to use may be simplified by considering the following:-
Place all outside edges of the block on the straight grain (true or cross), and
Whenever possible, sew a bias edge to a straight grain to stabilise the bias edge.
However, in some cases, design may determine the grain line, in which case bias edges may be tamed using spray starch or careful staystitching 1/8” or 3mm from the raw edge.
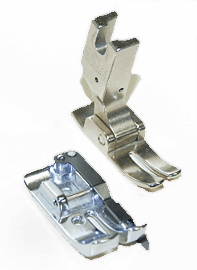
Machine piecing is very popular with quiltmakers who wish to see results more quickly than can be achieved with hand piecing.
Construction differs in that pieces are generally sewn together from edge to edge rather than from seam to seam. This is because templates have seam allowances added to them.
A sewing machine with a good straight stitch is all that is required.
Seam Allowances
The standard seam allowance for quiltmaking is ¼” or .75cm. Decide which measurement system you will use and use it for the entire quilt as imperial and metric measurements are not interchangeable.
Accurate seam allowances can be achieved by either of the following methods:
Method 1
Draw a template on a piece of graph paper and then add ¼” or .75cm seam allowance. Cut out accurately on the seam allowance lines.
Put the piece of paper under the presser foot and lower the needle onto the marked sewing line.
Lower the presser foot to hold paper in place.
If the cut edge of the paper template lines up with the outer edge of the presser foot, use the presser foot as your guide; or
If the outer edge of the template and the edge of the presser foot do not match, you can then place a piece of masking tape on the machine next to the edge of the paper to mark the seam allowance guide (take care that the masking tape does not interfere with the feed dogs).
When feeding patches through, line them up with your chosen guide (presser foot or masking tape) to achieve an accurate ¼” or .75cm seam.
Method 2
Cut three strips of fabric, each 1½” x 3” or 3.5cm x 10cm.
Sew the strips together using the edge of the presser foot.
Press seams toward the outer edges and check that the measurement of the centre strip is exactly 1” or 2cm wide.
If the above measurement is not correct you must adjust the guide on your machine. This can be done by either moving your needle position to the right or left or making a new guide with masking tape as described in method 1.
Note: The importance of accurate seams in machine piecing cannot be stressed highly enough. A small variation repeated over many seams, could make a large difference to a finished piece. It may also mean that the patches will not fit together.
1/4” Presser Feet:
Some machines come with this specialty foot, but if not, one is usually available to purchase. Even with this foot you should test your seam allowance for accuracy, since these feet don’t always produce an exact 1/4” seam. Some machines allow you to move the needle position to the right or left to achieve the perfect 1/4” seam allowance.
Pressing, not ironing, is as important as sewing for precise machine piecing.
Ironing, that is the aggressive back and forth motion, is used to remove wrinkles from clothing. This same motion, if used in patchwork, may distort otherwise perfectly cut and sewn patches.
Pressing, that is the gentle lowering, pressing and lifting of the iron on each seam, will avoid the distortions that would be caused by ironing.
The following hints should help overcome any problems associated with pressing:-
Press - don’t iron.
Decide which fabric the seam will be pressed towards and place on the pressing surface with that fabric on top.
Always press each seam after sewing, this will set the stitching into the fabric and help the seam to sit flat.
Without moving the fabric from the ironing surface, roll the top fabric open and press the seam from the right side.
Correct mistakes by returning the unit to its unpressed position and steaming.
Once unpressed, re-press the seam in a new direction.
Machine stitching is done from raw edge to raw edge.
Backstitching is unnecessary as all seams will eventually be sewn across and secured by another seam.
Make sure that your stitch length is small enough so that it will not come unstitched easily before being crossed by another seam.
When stitching, place patches, with the right sides together and run matched raw edges of the seam along the pre-tested seam allowance guide.
Take care not to tug or pull on the fabric as it feeds through the machine
Buying a sewing machine is a compromise between essential features, feaures that you would like to have and price. The range of machines, models and price points on the market can be overwhelming.
First step is to decide on what features are important to you for the type of sewing you do. If you are fairly new to quilting and sewing, it is good to buy a machine that is a little more advanced than you are. You will grow into the features. A machine can be serviceable for over 10 years.
If you are planning to use the machine for quilting as well as piecing, these features are very useful.
1. ability to change stitch width and length
2. ability to move needle position
3. needle up/down position
4. be able to lower feed dogs for free motion quilting
Quilting machines will have a larger throat size to allow you to manipulate the quilt while free motion quilting.
Test the Machine in the Store and note the followiing main points:
Can the tension be adjusted easily?
Try doing some free motion quilting and look at the back of the quilt. See if the machine can be adjusted to your satisfaction. A machine with reliable and easy to use tension settings, will make it easy to switch between regular sewing duties, machine quilting, applique and other sewing.
Is the machine's lighting of the work area and visibility adequate?
Is it awkward for you to manipulate the fabric?
Can the machine use the threads you like to use eg metallic threads?
Feet Availability
You must be able to sew a precise seam allowance, using special presser feet as a guide and/or by adjusting the position of the foot. See the section on Feet and Bobbins for more information.
Other Features
A "free arm" machine with an extension table that fits flush with the arm to create an expanded sewing surface will be a feature you won't be able to do without once you use it.
Speed regulation can be useful but is expensive and mostly unnecessary
Sewing machines come with many more options such as automatic needle threaders, switches that let you run the machine without pressing on a foot pedal. While useful, many of these features are not necessary and can add considerably to the price.
Piecing requires being able to sew a precise seam allowance, using presser feet as a guide and/or by adjusting the position of the foot.
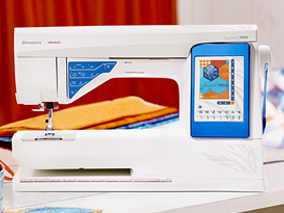
Does the machine come with a accurate 1/4" foot that is easy to install?
Does it come with a free motion foot? What kind is it?
Does the machine have a walking or even feed foot as an accessory.
Check whether the feed capability is built into the machine
Is the bobbin top loading, front loading or side loading?
Side loading bobbins also have needles that thread from the side.
Is it easy to wind the bobbin?
Is it easy to change the bobbin?
Is there a light or buzzer when the bobbin is low? Does this matter?
If you plan to use this machine on a quilting frame, the location of the bobbin will be important.
How hard is it to open the machine and clean around the bobbin case? If you plan to do bobbin thread work, you will want a separate bobbin case but they add to the cost.
When you buy your machine from a dealer, you will usually get lessons.
Ask what service is provided in the way of lessons, free check ups and ongoing services.
If you purchase your machine at a quilt show, you may get a good price but you will not necessarily have the support of a dealer. The local dealer will not be obligated to provide lessons or service unless prior arrangements have been made between dealer and manufacturer. Each dealership is independent and many do not answer to the parent company for their behavior.
Ask around for reputable dealers. They do exist. It is easy to get reports from other customers if you take the time to do some research.
As an independent, professional quilter with extensive experience demonstrating, selling and teaching on the main brands and models sold locally, I recommend the
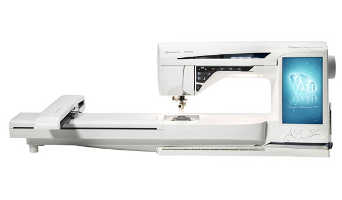
Husqvarna-Viking range of machines for quilting.
Husqvarna sewing machines have the range of models, price points, features, ease of use and reliability that makes them very suitable for piecing and machine quilting.
The exclusive Sewing Advisor® makes piecing and quilting a sewing pleasure.
My current machine for piecing is a Sapphire 960Q and for embroidery a Designer Diamond.
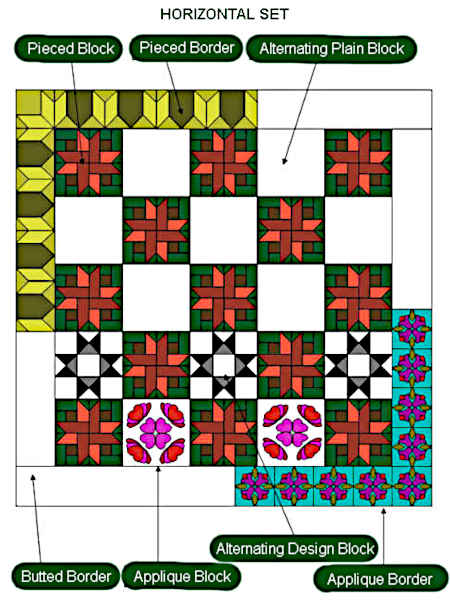
Applique Block
Most often used for curved pieces such as flowers, leaves etc. Are hand or machine stitched onto background fabric.
Applique Border
Same as an applique block but stitched onto long border strips.
Alternating Design Block
A block which has been placed between pieced blocks to enhance or add interest to the design.
May be pieced or appliqued.
Alternating Plain Block
A block made out of one piece of fabric which is placed between pieced blocks. Useful for showing off quilting designs, and for enlarging the size of the quilt.
Backing
Fabric used for the back of a quilt.
Batting
Also called wadding. It is the middle layer of the quilt and is used to provide warmth and texture. It may be wool, cotton, polyester or a combination.
Binding
Strips of fabric used to finish the quilt edges.
Block
The repeated design, pieced or appliqued, which makes up the main body of the quilt.
Butted Border
A pieced, appliqued or plain border which has been added to a horizontal set.
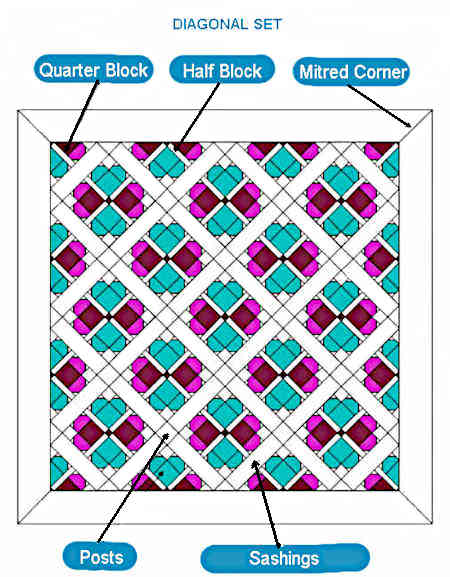
Diagonal Set
Blocks that have been set ‘on-point’ to form diagonal rows.
Half Block
Used to straighten edges in a diagonal set.
Half-Square Triangle
The short sides of the triangle are on the straight grain.
Horizontal Set
Blocks that have been placed in a square configuration.
Mitered Corner
Borders that have been joined at a 45º angle. Best used with a diagonal set.
Pieced Block
Small pieces of fabric which have been joined by hand or machine to form a design.
Pieced Border
Small pieces of fabric which have been sewn together to form long strips to frame the main body of the quilt.
Posts
Pieces of fabric used to join sashings/trammings at the intersection of blocks.
Quarter Block
Used to fill corners in a diagonal set.Used to fill in corners and complete rows in diagonal sets.
Quarter-Square Triangle
The long side of the triangle is on the straight grain.
Quilt Top
The top or upper layer of a quilt.
Sashing/Tramming
Strips of fabric used to sew rows of blocks together.
Sleeve
Rod pocket or tube of fabric attached to the back of a quilt to enable the quilt to be hung.
Horizontal Set
Blocks that have been placed in a square configuration.
Diagonal Set
Blocks that have been set ‘on-point’ to form diagonal rows.